Sunday, October 27, 2013

Cascading Pink Ripple Stitch Baby Blanket

I was so excited to work on this project-- it was a baby shower gift for Emma Kate, the first child of my best friend, Erin and her husband, Brad!

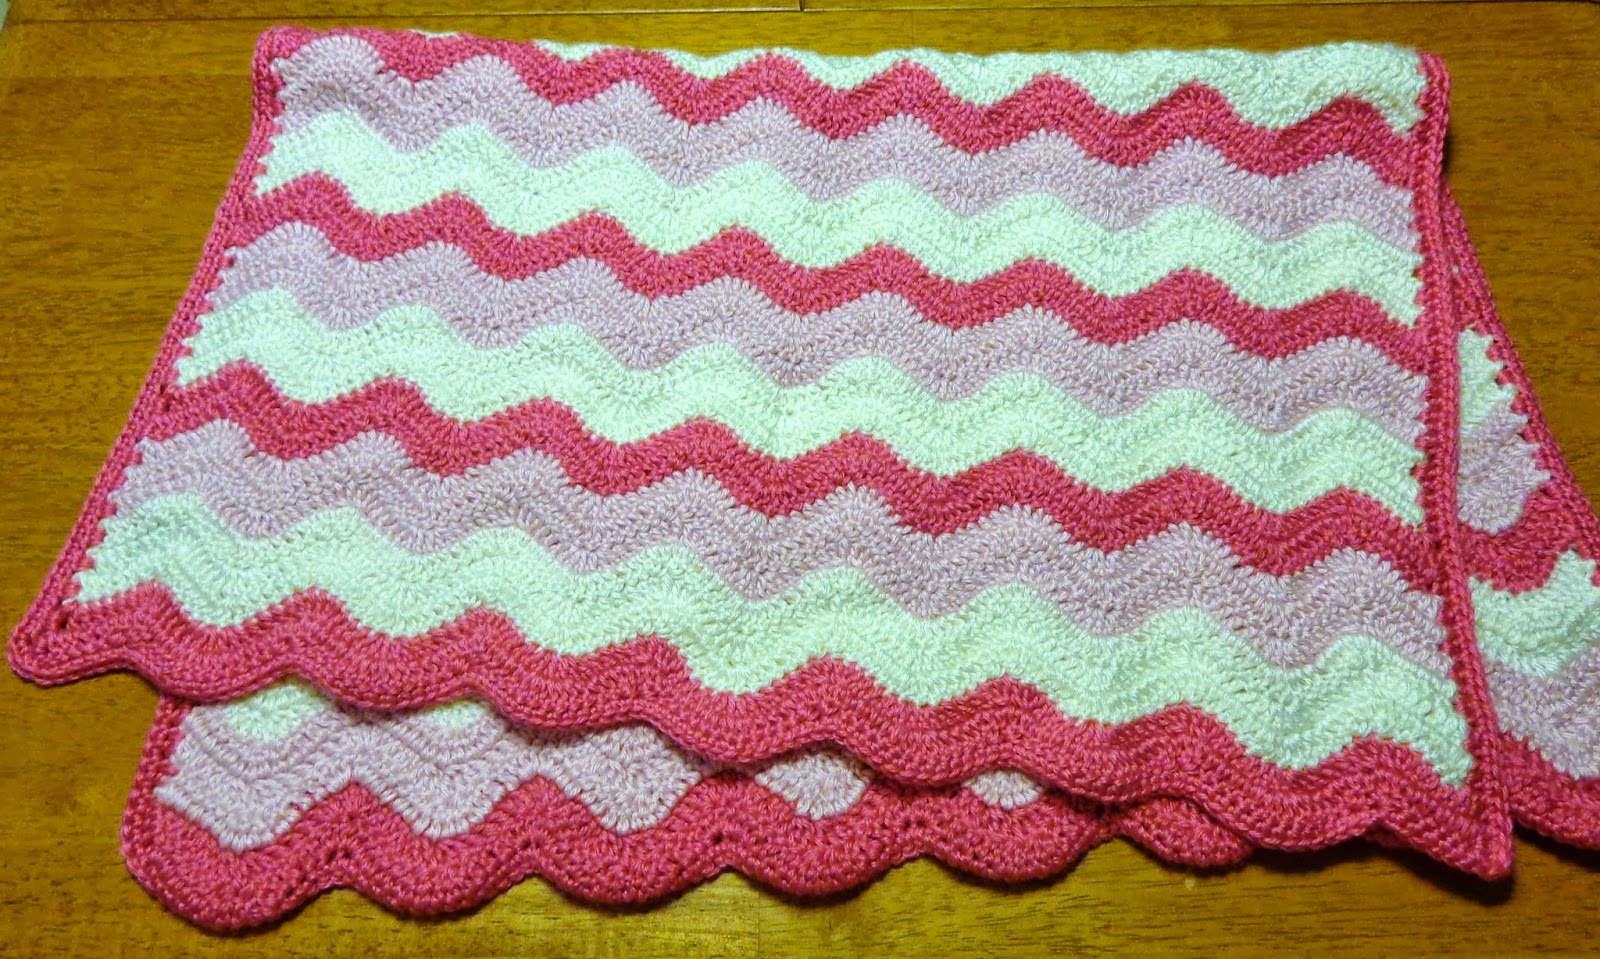
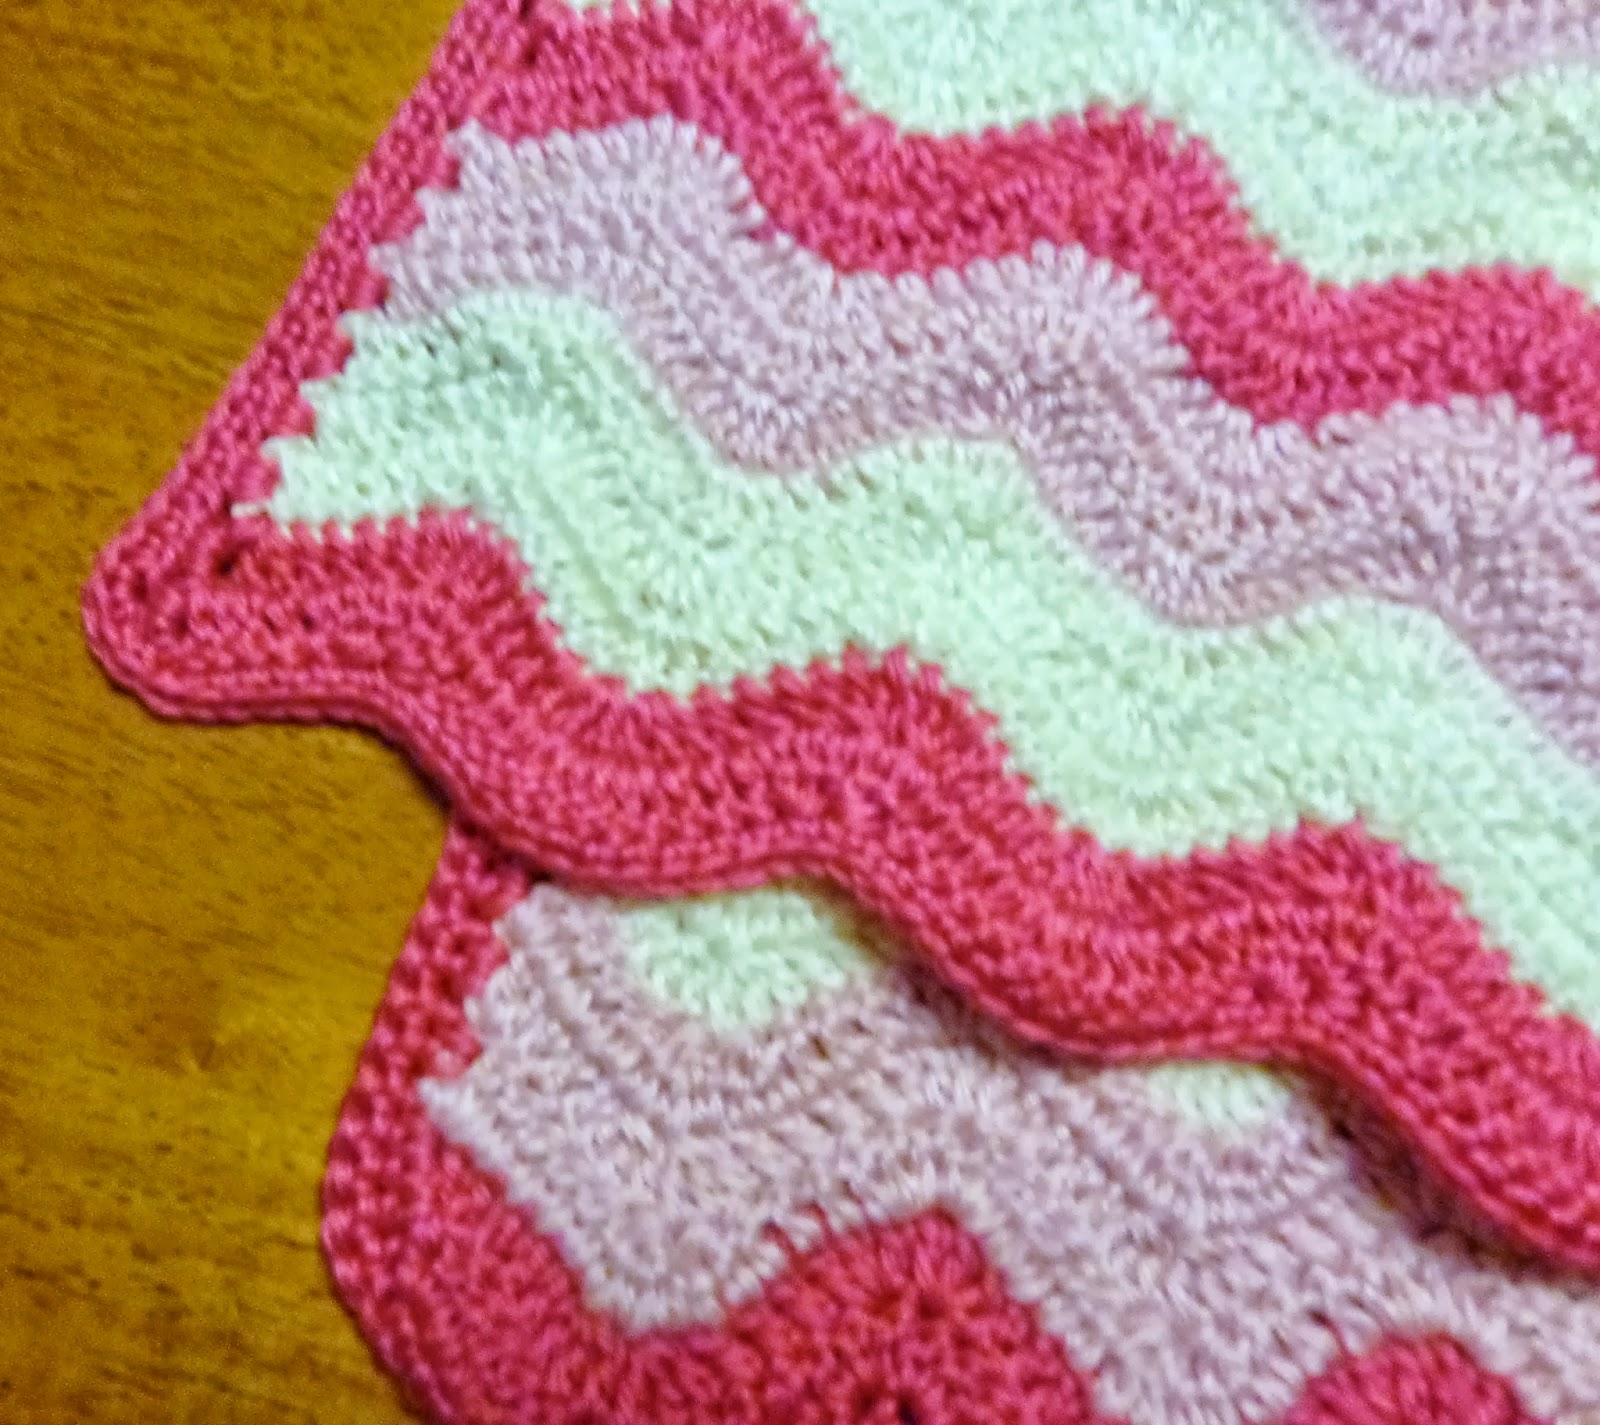
My initial inspiration came from the chevron pattern I found on Happily Ever After's blog, and the color scheme was an imitation of Ravelry's Cascading Ripple pattern. Most importantly, I learned how to crochet the ripple/wave stitch from Crochet Crowd's video tutorial.


For this blanket, I used a size G crochet hook and the following yarn:
- Caron Simply Soft, Watermelon (315 yards)
- Caron Simply Soft, Soft Pink (315 yards)
- Caron Simply Soft, Off White (315 yards)

To achieve the cascading color effect, my pattern was 2 rows of hot pink, 3 rows of light pink, and 3 rows of cream.  Finally, I ended with two rows of hot pink to achieve a "framed" look.


Once I finished the ripple rows, I decided to edge the blanket with a hot pink border.  I wasn't quite sure how to go about it on a ripple stitch, but found some direction with Sedruola Maruska's instructional video. After a little experimenting, the pattern for my edging involved crocheting two half doubles into the opening at the end of each ripple row, which I did on both long sides of the blanket.


After that, I finished the edging by crocheting a single crochet stitch around the entire blanket.  Side note:  I started and ended in the "nook" of one of the ripples, because it seemed like a better hiding place for the knot.


After all was said and done, I still ended up with a small ball of leftover yarn in each color, and the blanket measured 24 inches wide by 32 inches long.


I hope this gives you some inspiration... Happy stitching!

Jilliane


Update:  Check out Emma Kate's adorable newborn photos by Kelly Long Photography.  The blanket and Flower Headband go so well together!


Are you on Pinterest?  Follow my latest handiwork or crochet inspiration board!  

Saturday, October 26, 2013

Newborn Hat with Flower

My latest project was a cute little hat for my best friend's baby girl, Emma Kate.


This is my first-ever attempt at crocheting a hat, and it was surprisingly easy.  I followed a tutorial by Aesthetic Nest who explained the pattern step-by-step.  This tutorial is great-- it even provides patterns for different sizes.  I used a size G crochet hook and followed the pattern for size 3-6 month.  Side note: I think this size is closer to newborn... perhaps my stitch is a little tight?


This project only used a little bit of yarn-- I'm not sure exactly how much.  I used scrap yarn left over from other projects:
- Red Heart Super Saver, Orchid
- Caron Simply Soft, Off-White

The only variation I made was on the flower.  Rather than crochet the entire project in one color, I crocheted the first layer of the flower in cream and the second layer in purple.  I really like how it turned out!


Well, hope this gives you some inspiration... Have stitching!

Jilliane


Update:  Emma Kate was welcomed into the world on November 27.  At 7-1/2 pounds, her hat fit perfectly!


Are you on Pinterest?  Follow my latest handiwork or crochet inspiration board!  

Wednesday, October 16, 2013

Pittsburgh Steelers Kid's Scarves

Last winter, I was feeling motivated and decided to make black and yellow Pittsburgh Steelers scarves for our three nephews who are big Steelers fans.  I wanted each scarf to be unique so that the boys could tell them apart from each other, so I picked these three distinct patterns.  If my memory serves me right, I used Caron's Simply Soft yarn-- one skein each in black and yellow.

Scarf #1:
I followed Red Heart's Rib Crochet Striped Pattern and then added some fringe on the ends.  (This scarf was so soft and squishy!)


Scarf #2:  
I adapted the Chunky Crochet Baby Blanket tutorial slightly to achieve this look with two strands of yarn-- with more fringe, of course.


Scarf #3:
I followed the Crochet Crowd's video tutorial for the wave/ripple pattern and then added fringe to finish it up.  


I hope this gives you some inspiration... Happy stitching!

Jilliane


Are you on Pinterest?  Follow my latest handiwork or crochet inspiration board!  

Tuesday, October 15, 2013

Color-Block Granny Square Blanket

I have to say that I'm really really proud of my granny square blanket. It is my biggest crochet project, and took me most of March and April to make it-- sometimes I'm still awestruck that I finished it!  


My inspiration to create multi-colored squares framed in black came from this image-- the black outline really makes the colors pop!  From there, I learned how to create granny squares using instructions from Lisa's Granny Square Afghan Pattern


I used about 10 different yarns for the granny squares.  I started with scraps from previous projects and then purchased a few new skeins as my vision for the project grew.  A few of my yarns were a little thinner than the others, and I ended up stitching a single crochet stitch border around those squares in order to make them the same size as the others. This approach worked just fine, and it's not noticeable at all. For the black border, and I used about 2 skeins of Caron Simply Soft.  


I ended up making 140+ squares.  Before I started connecting squares, I laid out all of them on my kitchen table and played around with the color placement and measurements until I really liked it.  The final product was 10 squares by 14 squares.  


I spent a lot of time researching and deciding how to connect all of my squares. Knot Your Nana's Crochet gave me a lot of ideas.  Eventually I chose the Granny Join Stitch, because it looked very similar to the granny squares and I thought the blanket was busy enough with so many colors.  For the Granny Join Stitch, I followed the tutorial on Carina's Craftblog, and I'm really happy with the outcome.  


Connecting the squares is a loooong process and staying organized was important so I didn't mess up the color pattern I planned out. Basically, I started on the far right row and connected all of the squares into a long strip of 14 squares (using the Granny Join Stitch). Then, I repeated this process for the second row. Then I used the same Granny Join Stitch to connect these two long strips.  Each time I completed another strip/row, I connected it to the other completed rows. 


Side note:  You could make all of your strips first and then connect them-- that would work, too. For me, it was A) motivating to see the blanket "growing" and B) more interesting to switch back and forth between long vertical stitches and short horizontal stitches. 


Once all of the strips were connected, I crocheted a border using the Granny Square Stitch I mentioned previously (Lisa's Granny Square Afghan pattern).  I used the instructions for creating additional rows, and my border is 3 rows of this stitch.  


I hope this gives you some inspiration... Happy stitching!


Jilliane


Are you on Pinterest?  Follow my latest handiwork or crochet inspiration board!  

Thursday, October 10, 2013

Thick & Quick Baby Blanket

This adorable baby blanket was whipped up in just a few hours for our friends' first child, Lauren Alyse.  It is a simple, single crochet stitch using three strands of yarn simultaneously.  I was inspired by the Chunky Crochet Baby Blanket Tutorial and used those instructions to get started.


Something I really like about this pattern is how creative you can get with the possibilities-- color combinations, yarn weight, number of strands of yarn, etc.  I've used this pattern/stitch once before to make a Pittsburgh Steelers scarf using a strand each of black and yellow yarn, and it turned out great.


For this blanket, I used a size P crochet hook and the following yarn:
- Red Heart Super Saver, Perfect Pink (2 - 364 yards)
- Red Heart Super Saver, Orchid (2 - 364 yards)
- Red Heart with Love, Pewter (2 - 370 yards)


I purchased two skeins of each color to be on the safe side, but ended up using only about 1-1/2 skeins of each.  The blanket measures 30 inches by 40 inches-- the perfect size to use as a winter-time blanket, as a crib mat, or for tummy time.


I hope this gives you some inspiration.  Happy stitching!

Jilliane


Are you on Pinterest?  Follow my latest handiwork or crochet inspiration board!