Monday, March 24, 2014

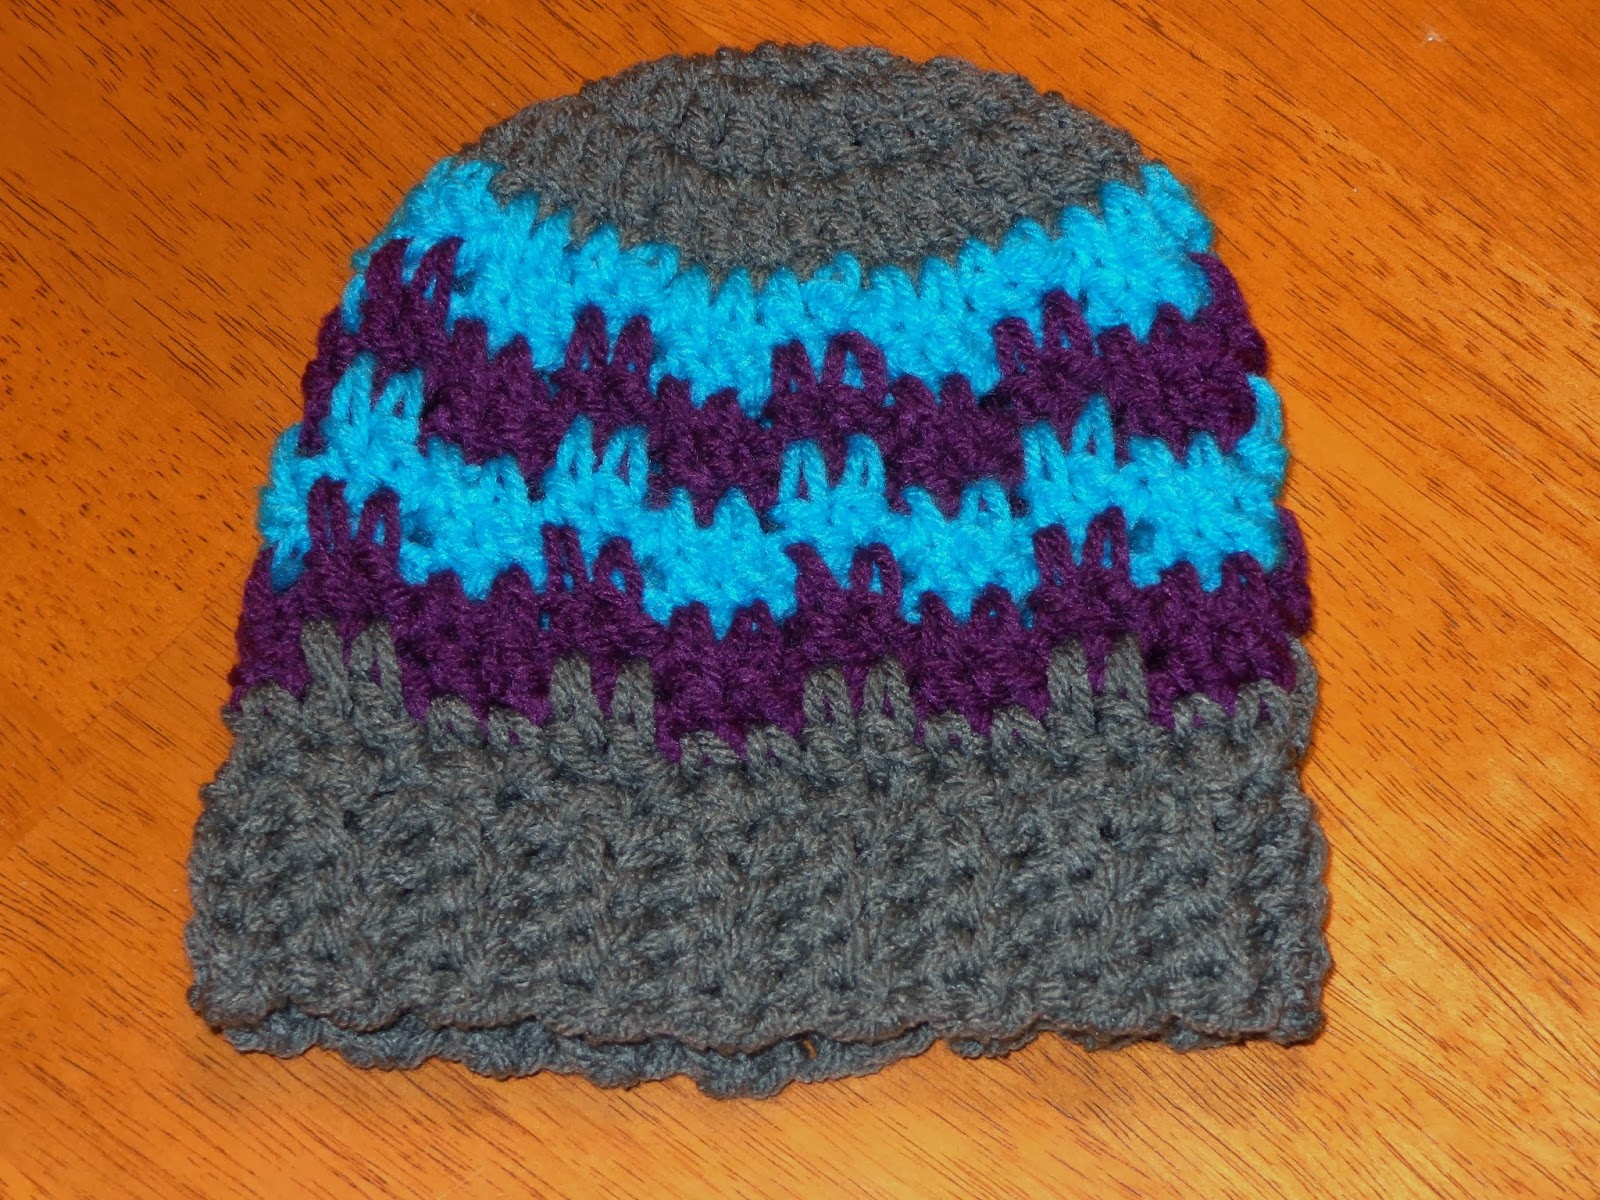
Leaping Stripes & Blocks Newborn Beanie

My cousin, Daisy and her husband are expecting their first child in late-April, so I decided to make crochet a matching blanket and beanie for the little guy.


After crocheting the beanie, I was feeling skeptical about the sizing, so I made some adjustments and crocheted a second smaller beanie.  Throughout the blog, I'll refer to the baby beanie and the newborn beanie.

For both beanies, I used the same three colors of yarn as I did with the matching blanket-- Red Heart Super Saver in Dark Orchid, Red Heart Super Saver in Turqua, and Red Heart with Love in Pewter.  And once again, I followed Moogly's Leaping Stripes and Blocks pattern.

Here are my notes for the newborn beanie:  
I used a size G crochet hook.  After completing Round 3 (36 stitches), I skipped ahead to Round 5 of the leaping blocks section.  After completing Rounds 5-10 of the leaping blocks pattern, I skipped ahead to Round 13.  For the edging, I crocheted only 3 chains.

The newborn beanie measures about 5-1/2 inches tall and 13 inches around.

Here are my notes for the baby beanie:
I used a size "I" crochet hook.  After completing Round 3 (36 stitches), I skipped ahead to Round 5 of the leaping blocks section.

The baby beanie measures about 7-1/2 inches tall and 15 inches around.


I am so excited to see the handsome little guy wearing his beanies!  Hope this gives you some inspiration for your next project.  Happy hooking!

Jilliane


Update:  Alcott Jameson was born on March 31!


Are you on Pinterest?  Follow my latest handiwork or crochet inspiration board!  

Leaping Stripes & Blocks Baby Blanket

This baby blanket is a gift for my cousin, Daisy who is expecting her first child-- a baby boy-- in April.  And to go with it, I crocheted a matching baby beanie in the same leaping stripes and blocks pattern.


The color palette was inspired by Daisy's wedding colors: purple & turquoise.  For yarn, I used 1-1/2 skeins each of Red Heart Super Saver in Dark Orchid, Red Heart Super Saver in Turqua, and Red Heart with Love in Pewter.


For this project, I followed Moogly's tutorial for the Leaping Blocks and Stripes Blanket.  I used a size "I" crochet hook and followed the pattern for a standard baby blanket (36" by 36").


For the color pattern, I simply alternated rows of turquoise, grey, and purple throughout the blanket.  And for edging, I did a single crochet stitch around the entire blanket in turquoise.


Despite following the pattern for a 36" by 36" standard baby blanket, this blanket turned out much larger-- about 50" by 50".  I suppose that just means Alcott has room to grow!


Hope this inspires you to start your next project... Happy hooking!

Jilliane


Update:  Alcott Jameson was born on March 31!


Are you on Pinterest?  Follow my latest handiwork or crochet inspiration board!  

Sunday, March 16, 2014

Double-Crochet Beige Cowl

This great cowl is actually for me-- crazy, right?!  I was inspired by a cowl worn by one of my students and decided to make an attempt at imitating it.


For this project, I used a size "I" crochet hook and about two-thirds of a skein of Red Heart Super Saver yarn in Buff.


After studying the student's cowl, here is the super-simple pattern I created:

Foundation:  Chain 61 (or any other odd number)
Row 1:  dc in 5th chain from hook, *ch 1, skip 1, dc 1, repeat from * to end.  Ch 3, turn.
Row 2:  *dc around the ch 1 space, ch 1, repeat from * to end.  Ch 3, turn.

Repeat Row 2 until you reach your desired length.  Secure off the last stitch-- no need to cut the yarn.

Stitching the ends together:
Lay the project flat and then line up the ends.  Stitch together using a whip stitch, which you can learn here: Bunny Mummy's whip stitch tutorial.  I chose the whip stitch because it blends in well with the pattern.


All done!  My cowl measures 37 inches around and 15 inches wide which makes it very fluffy and cozy.


Aside from varying the length, width, yarn texture, and color patterns, I'm sure this would be great with buttons, bows, and even flowers.  Hope you're feeling inspired to crochet your own version of this simple cowl!

Happy hooking,
Jilliane


Are you on Pinterest?  Follow my latest handiwork or crochet inspiration board!  

Friday, March 14, 2014

Houndstooth Infinity Scarf

After crocheting so many blankets lately, I was excited to work on a smaller and quicker project.  This houndstooth infinity scarf is a birthday gift to my sister, Allison who's turning 29... again.  (Love ya, sis!)


I was inspired by the Hounds Tooth Scarf pattern by Kathy Lashley.  My stitch tends to be a little tight, so I used a size K crochet hook-- one size larger than recommended in the tutorial.  For yarn, I used Red Heart Super Saver in Zebra (244 yards) and Red Heart with Love in Boysenberry (370 yards, used about half).

I had good luck using the black/white blend yarn (Zebra) before with the Thick and Quick Steelers Blanket. With both projects, the blended yarn created a neat pattern with no effort on my part.  With this scarf, I noticed the zig-zag pattern emerging after about 20 inches and was able to choose a stopping point that completed the pattern perfectly.


This pattern was really fun to do!  Switching back and forth between single crochet and double crochet stitches kept it interesting.  And the project moved so quickly with the blogger's suggestion to crochet around the loose yarn, rather than cutting it when switching colors after each row.

Modeling my amazing creation... :)

The scarf measures approximately 9 inches wide by 60 inches long/around.  As you can see, it layers nicely to create a cute cowl effect-- perfect for cold winter weather!  (Perhaps I'll crochet another one for myself!)

Well, hope this gives you some inspiration.  Happy hooking!

Jilliane


Are you on Pinterest?  Follow my latest handiwork or crochet inspiration board!  

Puffy Spike Stitch Infinity Scarf for Child

This was a short and simple project that put a big smile on my niece's face!


I used a size H crochet hook and scraps of Red Heart Super Saver in Orchid and Heather Grey.  I was inspired by the puffy spike stitch tutorial by Crochet N' Crafts, and only made a few minor adaptations to these instructions.

  1. For my pattern, the puffy spike rows involved 5 single crochet stitches between each puffy spike. To replicate that look, you would start with a foundation in a multiple of 6 (plus 1 more). 
  2. My puffy spikes had 3 "spikes" each, which were all inserted 3 rows below the skipped stitch.  The tutorial says to stagger the spikes at 1, 2, and 3 stitches below; however, I liked my adaptation better for this project.
  3. The tutorial shows the puffy spikes stacked directly above each other.  I decided to shift the puffy spikes so that they were more nested and layered with each change of colors.

My pattern (color & stitches):
Grey:  foundation row, 3 rows single crochet
Purple:  1 row puffy spike, 2 rows single crochet
Grey:  1 row puffy spike, 2 rows single crochet
Purple:  1 row puffy spike, 2 rows single crochet
Grey:  1 row puffy spike

As mentioned in the tutorial, the puffy spike stitches look slightly different from the front and back-- it looks very similar, if you ask me.

Front

Back

I really enjoyed this stitch and expect to use it again for edging on a blanket.  The scarf measures 3-1/2 inches wide by 59 inches long-- perfect to keep a little girl warm in the cold winter weather.

Hope this inspires your next project.  Happy hooking!

Jilliane


Are you on Pinterest?  Follow my latest handiwork or crochet inspiration board!  
Thursday, January 30, 2014

Child Hat with Ribbon Bow

Little Miss Emma grew out of her newborn hat, so I decided to crochet a new one for her!


Just like last time, I followed the 3-6 month pattern by Aesthetic Nest Crochet.  This time I used a size K crochet hook and thick, bulky yarn:  Lion Brand Yarns in Phoenix Azalea (1 skein, 64 yards).  

A couple variations from the pattern:
1)  I followed the pattern up to Round 5 (and added 1 extra hdc for 36 hdc total).  Then, I skipped ahead to Rounds 9-10 of the pattern (maintaining 36 hdc).  After that, I skipped ahead to Round 12 (decreasing to 33 hdc), followed by the eyelet and edging rounds. Final measurement:  18-inch circumference.

2) I skipped the flower this time; instead, I weaved a wide, grey ribbon through the posts/spaces and finished with a simple bow.

Front


Back

This was a fun, quick project and I hope it keeps Emma cute and warm!

Happy hooking,
Jilliane


Are you on Pinterest?  Follow my latest handiwork or crochet inspiration board!  

Tuesday, January 7, 2014

Striped Poncho for Child

Well, my niece loved her Poncho With Scalloped Edging so much that I decided to make another one for her upcoming birthday in February.  I'm really proud of this project-- it turned out so stinkin' cute!!


I used a size K crochet hook and the following yarn:  Red Heart Super Saver in Perfectly Pink, Grey Heather, and Orchid (approximately 1/2 skein or 150 yards each).

The color pattern was inspired by Olga's Bright Diagonals Baby Blanket-- I really like the look of thick, bright stripes paired with thin, neutral stripes.  For this poncho, my color pattern was 1 row in grey, 3 rows in pink, 1 row in grey, 3 rows in purple, and repeat.


I followed a graphic pattern on Le Monde De Sucrette's blog.  If you're more comfortable following written instructions, here are my notes:

Foundation (grey): 48 chains, connect ends with sl st

Row 1 (grey): sc 48, sl st
Note: Row 1 is my own adaptation from the original pattern; I thought the collar would look better being slightly thicker than the other rows.  You could skip this and move right on to Row 2, if you prefer.

Row 2 (grey): first shell [ch 3, 1dc in each of next 2 sc], ch 1, skip next sc, *next shell [1dc in each of next 3 sc], ch 1, skip next sc, repeat from * until end of row, sl st in ch3 where you started (12 shells)

Row 3 (pink): ch 4, shells *[3dc in next ch1 space], ch 1, repeat shell* 6 times, crochet 6th and 7th shell in same space with ch1 between 6/7 to create first corner, repeat shell* 6 more times, crochet 13th and 14th shell in same space with ch1 between 13/14 to create second corner, 14th shell [2dc, sl st in ch3 where you started]
Note: Now that you've created your first set of corners, the remaining rows will be a cake-walk.  Just continue to create corners in the ch1 space between corners.

Row 4 (pink): first shell [ch 3, dc2 in same space], ch 1, *next shell [3dc in next ch1 space], ch 1, repeat from * until end of row (remember: crochet shells 7/8 and 15/16 in same space to continue corners), sl st in ch3 where you started.
Note:  You'll notice that even rows start with ch3, while odd rows start with ch4.  This minor difference is because the even rows start in a space, while the odd rows start by jumping over the space.  The extra chain is your typical ch1 to cross the space.

Repeat rows 3 and 4 until you reach desired size.

Last Row (grey):  ch1, 1sc in middle dc of shell, *mock shell [3sc around ch1 space, 1sc in middle sc of next shell], repeat *mock shell until end, sl st.  This is an adaptation of a tip I learned from Crochet for Knitters video tutorial at about 16:30.

Other Notes:
- With my instructions, you'll never turn over this project.  Just keeping working round and round.
- To switch colors, I simply snipped the yarn and tied together the two colors. With the double crochet stitches going around the ch1 space, it's easy to camouflage the knot.
- Writing crochet patterns is hard work.

Fringe
The fringe was very simple to do.  First, I cut many pieces of yarn 6 inches long.  Then, I gathered three pieces of yarn (one in each color).  Finally, I looped the set of yarn around every third single-crochet stitch in the edging.  Ta-da!


Drawstring for Collar
The drawstring is simply a chain with curlicues on each end.  The opening for the collar was roughly 20 inches, so I doubled that and crocheted a foundation chain about 40 inches long.  Now, before you start the chain-- because the curlicues are crocheted from the bottom up, you'll need to leave yourself a lot of yarn for when you go back to crochet the curlicue on the starting end.  

Here's what I did:
  1. Laid about 5-6 feet of yarn in a neat pile.  Do not cut the yarn.
  2. Starting 5-6 feet into the yarn, crocheted the foundation chain 40 inches long.
  3. Without tying off, crocheted the first curlicue following this tutorial by Fiber Flux.  Note:  My curlicues were 17 chains long, which equaled 4 inches long.  To finish the curlicue, I tied off the yarn and secured it to another chain with a knot (hidden underneath a layer).
  4. Crocheted the second curlicue on the starting end of the chain with the extra yarn that was set aside.  

To finish the drawstring, I weaved it in and out of the first row of grey shells.  Because the first row had 12 spaces, I weaved the drawstring under two shells in the back to get it centered on the front.

Back

Front

Curlicues

All done!  The poncho is approximately 25 inches wide and 21 inches long. Adorable, right?!  


Hope this poncho inspires you to start your next project!  Happy hooking!

Jilliane


Are you on Pinterest?  Follow my latest handiwork or crochet inspiration board!